
INTRODUCTION: ‘Cracker’ is a term that refers to a programmer who deals with the development and circumvention of computer software security. Breaking computer software security is the best way to increase your knowledge of software protection against illegal users. Cracker’s aim IS NOT to spread software piracy.
The programs that help to break software security are generally referred to as cracks. I am going to present two ways to illegally register a security application which is included in CrackMe2 program. The author of the security program is a Polish cracker - massh from CookieCrK group. This type of program is developed by crackers in order to gain experience. It is also crackers who break such programs.
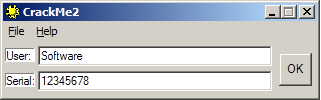
Figure 1
As can be seen in Figure 1, to register the program, a user name must be entered (User dialog box) followed by the registration key (Serial dialog box). In the registration process an individual key is created for each user. The task of the cracker is to register the program without the correct registration key or to create one for a specific user. Registration without the correct key requires a modification of the registration procedure or its complete removal. The registration procedure can be removed when the registration key is not at the same time the key decrypting the secured program instructions. In case of encrypted secured program instructions and the decryption key that is the value based on the user name, a key generator should be created.
FIRST STEPS: There is no specific formula for a crack, because every security program requires an individual approach. The first step is the analysis of the secured program, which consists in collecting as much information as possible about the program. The language in which it was written, the program executable file header format, used external resources, references to system registers and program files are the basics to get started. As I mention, the most common tools for a cracker are SoftICE debugger and W32Dasm, and in case of a secured program written in Visual Basic, the right tool to choose is SmartCheck program. The format of the program executable file is mostly PE (Portable Executable) and it determines the way in which particular sections and tables of imported and exported functions are structured. The most important information about the resources used by the program are the imported functions. If the program imports functions associated in the system with time measurement, one can expect security in the form of time constraints. When the program refers to system files and registers, there is a possibility that it saves important, from the cracker’s point of view, information in them, such as installation date, user name or registration key. References to files and registers can be detected owing to monitors, like Process Monitor.
Having gathered all the necessary information, we can proceed with our attempt to break the security in the computer memory. Most frequently, program tracking in computer memory starts at the point when the user enters the registration key. The trapping of called functions is possible thanks to the knowledge of imported resources. For a cracker the most important are the functions responsible for handling edit controls - dialog boxes with space for the password. Whether the program is registered or not is decided by the instructions followed after entering the key. The cracker’s task is to remove, modify, or reverse the function responsible for the registration.
NECESSARY TOOLS: The amount of information that can be extracted from the program is enormous. The small size of CrackMe2 indicates that the program was developed in an assembler. With the assistance of EXE Explorer we can check the file format. When running EXE Explorer and selecting CrackMe2 by going to the menu File->Open..., we are immediately shown all the information contained in the file header - Figure 2. To view the imported functions, we click Imports tab - Figure 3.


Figure 3 - Imported libraries and functions of CrackMe2
GetWindowTextA() function imported from User32.dll library is a function that copies the text of the specified window's title bar to computer memory. It will allow for trapping CrackMe2. EXE Explorer program enables to get a detailed insight into the structure of the program executable file, which includes the security. As far as CrackMe2 is concerned, we are not interested in the PE (Portable executable) header, because we do not modify it. However, it should be pointed out that there are securities that do require intervention in the program file structure, eg. sometimes, to break the security a new section of the program file code has to be added.
The most important task of the disassembler is to translate the program executable file to mnemonics of the assembly language. W32Dasm is also a debugger, which enables us to track and analyze CrackMe2 while it is running. Thanks to the range of functions offered by W32Dasm, CrackMe2 security can be broken with this tool alone, but in case of more complex problems crackers use several programs. Before starting work with W32Dasm, you must select the program file that you are going to analyze. From the menu of Disassembler->Open File To Disassemble.. , the file including CrackMe2 program should be selected. As can be seen in Figure 4, CrackMe2 program code is edited in the main window. The first lines contain general information about the program header.

Figure 4 - W32Dasm disassembler - the main editing window
SECURITY ANALYSIS: Cracker’s next task is to analyze the instructions responsible for the program registration. To track the instructions, we use the debugger of W32Dasm, which allows us to carefully get to know the security. Experienced crackers do not always use the debugger. Sometimes, it is sufficient to read the instruction codes that the disassembler created and the weak point of the security can be found. I will present a method that enables to understand the way the program behaves while it is running as a process in the system. This will allow you to become familiar with the basic functions of W32Dasm and will give us the full picture of the security. After opening CrackMe2 in the disassembler, one should run CrackMe2 as a process controlled by the debugger. To do so, the following menu option should be selected: [Debug->Load Process]. When a window appears, which will allow us to enter the parameters of the process to be run, we click [Load]. Two additional windows will immediately pop up. Figure 5 shows the data window that contains a lot of information, but for us the most important is the information regarding registers and data stored in the memory.

Figure 5 - Debugger data window
The next step is to find a GetWindowTextA() function that will serve as a breakpoint against CrackMe2. To find the function in the program code, select the menu of Functions->Imports and find the function in the register of all imported functions. After selecting GetWindowTextA(), the instruction [0040142B] is selected in the editor. This is about calling a function of GetWindowTextA(). It is the parameters that are pushed onto the stack before the call that are significant for a cracker. Listing 1 shows the calling of the GetWindowTextA() function for the editing windows of User and Serial. To breakpoint the desired function, select the menu Debug->BreakPoint Toggle. Then, run CrackMe2 by selecting from the menu Debug->Run Process. The CrackMe2 window pops up immediately. You can enter any data in CrackMe2 and then press [ok]. In the main editing window of W32Dasm the call of the GetWindowTextA() function is selected. To proceed to the next instruction press [F8].
Now we go to the instruction located at [0040122A]
:0040122A 85C0 TEST EAX, EAXListings include numbers that are written in hexadecimal. Characters and digits are coded according to the ASCII standard. The digits that precede the program instructions are the opcodes of machine instructions. The first column of numbers contains the addresses at which the instructions in the computer memory can be found.
LISTING 1:
:004011FD      6A1F               PUSH 0000001F
:004011FF      6804214000         PUSH 00402104
:00401204      FF354C204000       PUSH DWORD PTR [0040204C]
:0040120A      E81C020000         CALL 0040142B
:0040120F      85C0               TEST EAX, EAX
:00401211      744D               JE 00401260
:00401213      A260204000         MOV DWORD PTR [00402060], EAX
:00401218      6A1F               PUSH 0000001F
:0040121A      682414000          PUSH 00402124
:0040121F      FF3550204000       PUSH DWORD PTR [00402050]
:00401225      E80120000          CALL 0040142B
:0040122A      85C0               TEST EAX, EAX
:0040122C      744D               JE 00401260
:0040122E      A364204000         MOV DWORD PTR [00402064], EAX
The instructions in Listing 1, followed directly after entering the data and pressing [ok], are responsible for data copying to the memory. The parameters that are pushed onto the stack before calling the function, specify the addresses in the memory where one can find the data, variable length and handles to edit controls. Thanks to that we know where to look for the user name and the registration key in the memory. The second parameter pushed onto the stack before the function of GetWindowTextA is a buffer into which the data from CrackMe2 is copied. This is why, the text of the User control can be found at [00402104], and the registration key of the Serial control can be found at [00402124]. To find the data in the memory, in the data window of the debugger one must type [00402104] in the User Addr1 control and [00402124] in the User Addr 2 control. To view the data, press [UA1] or [UA2]. The result is shown in Figure 5. The GetWindowTextA function returns the amount of bytes copied into the memory. In the case of the User data, its length is recorded at [00402060], and the length of the Serial data at [00402064].

Figure 6 - Debugger code window
The window shown in Figure 6 is the debugger code window. It displays the instructions that are currently being executed, that is the same ones that can be found in the main editing window. By sequentially pressing the [F8], we can track and analyze the executed code of CrackMe2. Following the instructions step-by-step, we arrive at the address of [0040117D], where the call instruction [CRACKME2.00401261] is located. This is about calling an internal function of CrackMe2, which is located at [00401261]. To see the contents of the function, press the [F7]. After entering the function, we can see:
LISTING 2:
:00401261     A160204000          MOV EAX, [00402060]
:00401266     390564204000        CMP [00402064], EAX
:0040126C     752F                JNE 0040129D
:0040126E     33C0                XOR EAX, EAX
The instructions in Listing 2 verify whether the length of the user name is the same as the length of the registration key. If the length of both variables is different, an incorrect registration key message is displayed. The last instruction resets the [EAX] register. The conclusion of Listing 2 is that the length of the registration key must be the same as the length of the user name.
Further instructions of the registration procedure include:
LISTING 3:
:00401270     8B7C2404            MOV EDI, [ESP+04]
:00401274     8B742408            MOV ESI, [ESP+08]
The first instruction copies to [EDI] register the address including the user name, and the second one copies to [ESI] register the address including the registration key. To find out what the [EDI] and [ESI] registers contain, after following the instructions in Listing 3, click [edi] and [esi] in the data window. The data contained in these registers will be displayed immediately, in other words the [EDI] register will include the name of the User control and the [ESI] register will include the registration key of the Serial control.
The instructions contained in Listing 4 are the heart of the security. Based on them, we can determine how the registration key is created and how it is impacted by the user name.
LISTING 4:
:00401278     0FB61F              MOVZX EBX, BYTE PTR [EDI]
:0040127B     0FB616              MOVZX EDX, BYTE PTR [ESI]
:0040127E     80FA30              CMP DL, 30
:00401281     7C1A                JL 0040129D
:00401283     80FA39              CMP DL, 39
:00401286     7F15                JG 0040129D
:00401288     80EA30              SUB DL, 30
:0040128B     83E30F              AND EBX, 0F
:0040128E     D0EB                SHR BL, 01
:00401290     2ADA                SUB BL, DL
:00401292     7509                JNE 0040129D
:00401294     47                  INC EDI
:00401295     46                  INC ESI
:00401296     803F00              CMP BYTE PTR [EDI], 00
:00401299     75DD                JNE 00401278
:0040129B     EB04                JMP 004012A1
The first character of the user name is copied into the [EBX] register. In fact, it can be found in the least significant part of the register, that is [BL]. The first character of the registration key is copied into the [EDX] register and it is also placed in the least significant part of the register, that is [DL]. The next four instructions are responsible for verifying whether the key character is a digit ranging from 0 to 9 (the value of 0 is represented in the ASCII standard by the number 30 hex, and the digit 9 in this standard is 39 hex). If the character is not a digit, it forms a jump to the procedure displaying a window informing about the incorrect registration. As it might have probably been noticed, there is a procedure hidden behind the address [0040129D] containing information about the incorrect registration of the program - the dialog box displaying this information is shown in Figure 7.

Figure 7 - Information contained at the address: [0040129D]
Another instruction subtracts from the first character of the key the value 30 hex, thanks to which in the [DL] register only the last four bits of the key character are left. Thanks to the instruction [AND EBX, 0F] the program will not distinguish whether the user name is written in upper or lower case, because the [AND EBX, 0F] instruction deletes the first four bits of the [BL] register. As a result, in the [EBX] register there are only the last four bits of the user name character. The [SHR] instruction is the operation of bit shift to the right, and its functioning modifies the BL register. The [SUB] operation refers to arithmetic subtraction. In our case, this means that values located in the [BL] and [DL] registers are subtracted. It should be noted that [BL] contains what is left form the user name character, and [DL] – the last four bits of the key character.
The next instruction is crucial for the registration process. The instruction [JNE 0040129D] constitutes a jump to the procedure containing information about an incorrect registration. The jump can be executed only when the [BL] and [DL] registers contain different values. For us, this means that we have discovered the way in which the registration key is created and we have also unveiled the relationship between the registration key and the user name. Thanks to that we know how to create the key for a particular user. Each letter of the user name is assigned a digit that forms its representation in the registration key.
It is easy to calculate the successive digits corresponding to the characters of the user name, because: eg., the letter ‘b’ is 62 hex. in the ASCII standard and 0110 0010 in the binary system. The [AND BL, 0F] instruction resets the first four bits, so we get 02 hex and 0000 0010 in the binary system, and after bit shifting to the right by one position (the [SHR BL, 01] instruction), we obtain 0000 0001, that is the digit ‘1’. In order to convert this digit to the character ‘1’ written in the ASCII standard, one must add up exactly what has been deducted from the DL register, that is 30 hex. As a result, for the letter ‘b’, we get 31 hex, in other words – the digit ‘1’. Please note that the program does not distinguish between uppercase and lowercase letters; therefore, in case of the letter ‘B’, the digit in the registration key will also be ‘1’. The [JNE 0040129D] instruction is crucial to the comparison of the characters of the user name and the registration key. Further instructions are responsible for the increase of the registers containing the addresses of the user name and the key, and are also responsible for the jump to the beginning of Listing 3. In the case of a correct registration key, the operations in Listing 3 are performed as many times as there are characters of the user name. Loop termination occurs when a key character does not match the character of the user name or when all the characters of the user name have been checked. The characters of the user name are assigned the following digits of the key:
The letters a, A, p, P, q, Q  are assigned the key digit  0
The letters b,B,c,C,r,R,s,S   are assigned the key digit  1
The letters d,D,e,E,t,T,u,U   are assigned the key digit  2
The letters f,F,g,G,w,W,v,V   are assigned the key digit  3
The letters h,H,i,I,x,X,y,Y   are assigned the key digit  4
The letters j,J,k,K,z,Z       are assigned the key digit  5
The letters l,L,m,M           are assigned the key digit  6
The letters n,N,o,O           are assigned the key digit  7
The program checked whether the key consisted of the digits in the range from 0 to 9. The digits 8 and 9 will not appear in any type of a key, because the greatest number that can be described in four bits is 7.
So as to best illustrate the working of the registration procedure, in Figure 8 I present a diagram, on the basis of which we can identify the weak points of the registration procedure.

Figure 8 – The diagram of the procedure validating the registration key
If we aim at removing the security and writing a crack for CrackMe2, we need to get to know the exact structure of the security. There are two ways to illegally register CrackMe2. The registration can be called legal only when the software company provides us with the registration key.
For the this type of security, the simplest method is to remove an instruction: [JNE 0040129D]. This is a task that a crack must perform.
The last step is to write the crack. The quickness of working, low volume of the executable code and the full control over the executed instructions are the reasons why cracks are created in an assembler.
Now that we are familiar with the whole security, we can terminate the debugging process of CrackMe2 by selecting from the menu Debug->Terminate Process.
HOW THE CRACK WORKS: The crack loads into the memory a file containing a program in which it is to remove the security. Then, it searches for the appropriate sequence of bytes and converts it.
Carcker’s task is to find in the program file the opcodes of the instruction [JNE 0040129D]. This is possible thanks to SoftIce which shows all the instruction opcodes in the program. In other words, the value we are looking for is two bytes: 7509 hex, this value is the opcode of the [JNE 0040129D] instruction. In practice, a greater amount of bytes is looked for, since 7509 hex. bytes may occur repeatedly in the program. Therefore, while entering the desired bytes in hexeditor, we also type in the two opcodes neighbouring with the bytes we are searching for. We enter 2ADA 7509 4746 and the editor automatically highlights the values that have been found. To be able to locate them in the program, open the CrackMe2 program file in hexeditor. We run hexeditor, open the CrackMe2 program file and in the menu Search->Find, we enter the desired value, that is 2ADA 7509 4746.

In Figure 9, we can see the highlighted opcodes of the [JNE 0040129D] instruction, which amount to 7509 hex. Now, we need to think about a way to replace two bytes to remove the [JNE 0040129D] instruction and at the same time not to destroy the whole program. There is an instruction available in the assembler - the NOP (No Operation) instruction, which does not do anything. It is a one-byte instruction whose opcode is the value of 90 hex. As we already know, we have to change two bytes, so we replace 7509 hex bytes with 9090 hex bytes and the program works in the way the cracker wishes it to work, that is, it enables registration in spite of providing an incorrect key. All that is left to do is to save the address at which the [JNE 0040129D] instruction occurs so that the crack "knows" which instructions should be changed.
This address constitutes the shift of the instruction we are searching for, in relation to the beginning of the program file and in the case of CrackMe2 amounts to: 0892 hex. The address can be seen in Figure 9. The first, eight-digit column of numbers refers to the addresses of the instruction opcodes in the file. For the line of 7509 hex. opcodes, the address is 0890 hex. and to this number we need to add 2, since opcodes are on the third position of the line. Thanks to that we obtain the correct address of opcodes in the file, that is 0892 hex. And exactly at this address the opcodes of the NOP instruction will be saved. There is one more security included in CrakMe2. The program is protected against changes in the program file, which means that it has been set an attribute: Read-only; in order to change the opcodes in hexeditor, one has to remove this attribute from the file. The easiest way to remove it, is to display the file properties in the Windows pop-up menu and to untick the ‘Read only’ box.
LISTING 5: A fragment of a crack program - the assembler syntax for the MASM32 compiler. Full source code of crack avaible is here.
        .486
        .model flat, stdcall
        option casemap :none

        include crack.inc

.code

;--------------------------------------------------------------------------

start:

        invoke GetModuleHandle, NULL
        mov hInstance, eax
        invoke GetCommandLine
        mov CommandLine, eax
        invoke LoadIcon,hInstance,500    ; icon ID
        mov hIcon, eax
        invoke LoadCursor,NULL,IDC_ARROW
        mov hCursor, eax
        invoke GetSystemMetrics,SM_CXSCREEN
        mov sWid, eax
        invoke GetSystemMetrics,SM_CYSCREEN
        mov sHgt, eax
        call Main
        invoke ExitProcess,eax

; --------------------------------------------------------------------------

    Main proc

        LOCAL Wwd:DWORD,Wht:DWORD,Wtx:DWORD,Wty:DWORD
        STRING szClassName,"crack_Class"

        invoke RegisterWinClass,ADDR WndProc,ADDR szClassName,
                       hIcon,hCursor,COLOR_BTNFACE+1

        mov Wwd, 175
        mov Wht, 200
        invoke TopXY,Wwd,sWid
        mov Wtx, eax
        invoke TopXY,Wht,sHgt
        mov Wty, eax

        invoke CreateWindowEx,  WS_EX_LEFT,
                                ADDR szClassName,
                                ADDR szDisplayName,
                                WS_OVERLAPPED or WS_SYSMENU,
                                Wtx,Wty,Wwd,Wht,
                                NULL,NULL,
                                hInstance,NULL
        mov hWnd,eax

        DisplayWindow hWnd,SW_SHOWNORMAL
        call MsgLoop
        ret

    Main endp

; --------------------------------------------------------------------------

    RegisterWinClass proc lpWndProc:DWORD, lpClassName:DWORD,
                      Icon:DWORD, Cursor:DWORD, bColor:DWORD

        LOCAL wc:WNDCLASSEX

        mov wc.cbSize,         sizeof WNDCLASSEX
        mov wc.style,          CS_BYTEALIGNCLIENT or CS_BYTEALIGNWINDOW
        m2m wc.lpfnWndProc,    lpWndProc
        mov wc.cbClsExtra,     NULL
        mov wc.cbWndExtra,     NULL
        m2m wc.hInstance,      hInstance
        m2m wc.hbrBackground,  bColor
        mov wc.lpszMenuName,   NULL
        m2m wc.lpszClassName,  lpClassName
        m2m wc.hIcon,          Icon
        m2m wc.hCursor,        Cursor
        m2m wc.hIconSm,        Icon

        invoke RegisterClassEx, ADDR wc
        ret

    RegisterWinClass endp

; --------------------------------------------------------------------------

    MsgLoop proc

        LOCAL msg:MSG

    StartLoop:
        invoke GetMessage, ADDR msg, NULL, 0, 0
        cmp eax, 0
        je ExitLoop
        invoke TranslateMessage, ADDR msg
        invoke DispatchMessage,  ADDR msg
        jmp StartLoop
    ExitLoop:
        mov eax, msg.wParam
        ret

    MsgLoop endp

; --------------------------------------------------------------------------

    WndProc proc hWin :DWORD, uMsg :DWORD, wParam :DWORD, lParam :DWORD

        LOCAL var    :DWORD
        LOCAL caW    :DWORD
        LOCAL caH    :DWORD
        LOCAL Rct    :RECT

    .if uMsg == WM_COMMAND
        .if wParam == ButtonID
            mov szFileName[0], 0
            invoke GetFileName, hWin, SADD("Open file"),
                                SADD("CrackMe2.exe",0,"CrackMe2.exe",0)
            invoke CreateFile,  ADDR szFileName, GENERIC_READ or GENERIC_WRITE, \
                                NULL, NULL, OPEN_EXISTING, FILE_ATTRIBUTE_NORMAL,NULL
            .if eax == -01h
                invoke MessageBox,  hWnd, SADD ("Can't open file !!!"), \
                                    ADDR szDisplayName, MB_OK
                ret
            .endif
            mov hFile, eax
            invoke GetFileSize, hFile, ADDR FileSize
            mov FileSize, eax
            .if eax != 02000h
                invoke MessageBoxA, hWnd, SADD("It's not the CrackMe2.exe !!!"), \
                                    ADDR szDisplayName,MB_OK
                ret
            .endif
            invoke SetFilePointer, hFile, 0892h, NULL, FILE_BEGIN
            invoke WriteFile, hFile, ADDR Patch, 2, ADDR ByteWrite, NULL
            invoke MessageBoxA, hWnd, SADD ("Mission Accomplished !!!"), \
                                ADDR szDisplayName, MB_OK
            invoke CloseHandle, hFile
        .endif

    .elseif uMsg == WM_CREATE
        INVOKE CreateWindowEx, WS_EX_CLIENTEDGE, ADDR EditClassName, ADDR EditText,\
                               WS_CHILD or WS_VISIBLE or WS_BORDER or \
                               WS_DISABLED or ES_CENTER or ES_MULTILINE,\
                               5, 5, 160, 143, hWin, EditID, hInstance, NULL
        mov hEdit, eax
        invoke GetStockObject, DEFAULT_GUI_FONT
        invoke SendMessageA, hEdit, WM_SETFONT, eax, 0
        invoke CreateWindowEx,  0, ADDR ButtonClassName, ADDR ButtonText, \
                                WS_CHILD or WS_VISIBLE, 5, 152, 160, 20, hWin, \
                                ButtonID, hInstance, 0
        mov hButton, eax
        invoke GetStockObject, DEFAULT_GUI_FONT
        invoke SendMessageA, hButton, WM_SETFONT, eax, 0

    .elseif uMsg == WM_PAINT
        invoke Paint_Proc, hWin
        return 0

    .elseif uMsg == WM_DESTROY
        invoke PostQuitMessage, NULL
        return 0
    .endif
        invoke DefWindowProc, hWin, uMsg, wParam, lParam
        ret

    WndProc endp

; --------------------------------------------------------------------------

    TopXY proc wDim: DWORD, sDim: DWORD

        shr sDim, 1
        shr wDim, 1
        mov eax, wDim
        sub sDim, eax
        return sDim

    TopXY endp

; --------------------------------------------------------------------------

    Paint_Proc proc hWin:DWORD

        LOCAL hDC      :DWORD
        LOCAL btn_hi   :DWORD
        LOCAL btn_lo   :DWORD
        LOCAL Rct      :RECT
        LOCAL Ps       :PAINTSTRUCT

        invoke BeginPaint, hWin, ADDR Ps
        mov hDC, eax
        invoke GetSysColor, COLOR_BTNHIGHLIGHT
        mov btn_hi, eax
        invoke GetSysColor, COLOR_BTNSHADOW
        mov btn_lo, eax
        invoke EndPaint, hWin, ADDR Ps
        ret

    Paint_Proc endp

end start
Listing 5 comprises all the operations that the crack performs on the CrackMe2 file. At the beginning, the opening of the file takes place - the GetFileName() and CreateFile() functions, if the functions return an error, the following message is displayed: ‘Can't open file!’. Next, the file size is downloaded - the GetFileSize() function. The size is used to check whether the opened file really is the CrackMe2 program, such procedures are often used in cracks, because using the crack for the purposes of other programs could destroy the modified program. In the case of CrackMe2, its size is 02000 hex., that is 8192 bytes. The next operation is to find - in CrackMe2 - the address, at which the 9090hex. opcodes will be saved. This operation is performed by the SetFilePointer function, whose second argument is the address we are interested in, namely 0892hex. The most important operation is to replace the 7509 hex, opcodes with 9090 hex. values. This is performed by the WriteFile() function, whose third argument is the address containing the opcodes of the NOP instruction, that is 9090 hex. In our case, the value of 9090 hex. is saved as a two-byte variable - Text1. The last function, CloseHandle(), closes the CrackMe2 file.The file contains the final crack attachment (the crack.exe file), including source codes (the crack.asm and crack.inc files). The crack was developed in an assembler, while as the compiler, the MASM32 v11.0 compiler was used - I fully recommend this compiler, because the its syntax is much clearer than, for example.: TASM32; also writing the manual to it takes less time.
Most of the source codes were created by a very "friendly" generator, of course the instructions responsible for the change of opcodes in the program to be broken one should write themselves. By means of a generator, one can create crack’s window, buttons and menus. If you find that, despite removing the most important instruction in the program, there is still a barrier in the form of the need to enter the key of the same length as the user name, I recommend writing a crack to get rid of this inconvenience. It should be created in a manner analogous to what I have presented.

SOLUTION FOR THE AMBITIOUS: To write a crack is not the only way to break the security. Cracks are shortcuts in terms of security breaking. As you gain experience you will find that this is not always the best way. Crack is not a good option if the security can validate the checksum of the registration procedure. And what if certain functions of the secured software are encrypted with a key derived from the user name? In case of the checksum, one can also modify the procedure responsible for validating this value and the program will run correctly, but you should take into account the number of hours needed to find this procedure. In such cases, the only solution is to write the key generator. This is a short program that can create the correct registration key based on the user name. I have called this solution the one intended for the ambitious, but sometimes it can be the only solution at all.
When writing a key generator, it should be remembered that the secured program itself provides a solution. The protected application contains a generator whose task is to validate the correctness of the key. In our case, the whole of Listing 4 is a generator. Only minor modifications of the validation procedure are sufficient to obtain a program generating keys for for any user. In a way similar to the crack, most of the code is created by the code generator (MASM32 Prostart Code Wizard), but the most important part of it needs to be written by yourself. I wrote the generator in assembly language, the language we analyzed in case of CrackMe2. Thanks to that, it will now be possible to use the instructions contained in the security to create the generator. Listing 6 contains the entire procedure of key generating for any user. The key generator with source code can be found here.
LISTING 6:
.if uMsg == WM_COMMAND
            .if wParam == Button1ID
                invoke GetDlgItemTextA, hWin, Edit1ID, ADDR Text, 31
            .if Text[0] == 0
                invoke MessageBox,  hWin, SADD("User Name is empty !!!"),
                                    ADDR ErrorCaption, MB_OK
                ret
            .endif
            invoke GetDlgItemTextA, hWin, Edit1ID, ADDR Text, 31
            lea esi, Text
            lea edi, Key
        NextChar:
            mov bl, byte ptr [esi]
            and bl, 0fh
            shr bl, 01h
            add bl, 30h
            mov [edi], bl
            inc edi
            inc esi
            cmp byte ptr [esi], 0
            jz EndLoop
            jmp NextChar
        EndLoop:
            xor bl, bl
            mov [edi], bl
            invoke SendMessageA, hEdit2, WM_SETTEXT, eax, ADDR Key
            ret
        .endif
The simple procedure of key generating has been created on the basis of the registration function contained in CrackMe2 and can be found in Listing 6. The most important instructions are [AND BL, 0Fh] and [SHR BL, 01h] – it is them that modify the characters of the username. The tasks of the rest of the instructions are to copy the characters and addresses, to expand the address registers, to perform jumps to the procedures responsible for the loop execution, and to collect and display the characters in the editing windows. The key generating procedure is called as many times as there are characters in the user name. This is due to the fact that each character of the user name must undergo such operations as was the case of CrackMe2. Taking advantage of CrackMe2 instructions ([AND BL, 0F] and [SHR BL, 01]), one can emulates the registration procedure in the generator.
BAD CRACKER: If you feel that breaking practice programs is an art for art's sake, you can try breaking one of commercial programs. However, the commercial programs are often characterized by much more complex registration procedures. This paper provides basic knowledge of cracking. While breaking commercial programs, one might often encounter other problems that should also be taken into account:
- most commercial programs is written in high level languages, which means several hundred times more code to explore. Finding the registration procedure will not be as easy as it is in the case of CrackMe2.
- many programs incorporate time constraints, which constitute a completely different type of security. Although they are most often easier to remove, they require trapping time measuring functions in the system. Thanks to EXE Explorer you will be able to determine which function should be trapped.
- the commercial programs consist of multiple files, and the security does not have to be included in the program file. In such case, ProcMonitor might prove helpful as it tracks the references to all the files used by the given program.
- the programs protected in the system registers often hide a lot of valuable information from the cracker’s point of view, which is why it is worth taking the advantage of register monitors during the installation of commercial programs. The best register monitor is ProcMonitor.
- a separate chapter connected to cracking is the protection of programs against cracking tools. These mainly relate to debuggers detection in the system - there are a lot of methods for detecting SoftIce debugger. Special tools intended for removing such protection are the cracker’s lifeline in this case.
- setting appropriate traps is difficult. Programs use various editing windows operating functions, the most common of which are: GetDlgItemTextA(), GetWindowTextA(), GetWindowTextLength(). All functions used in Windows can be found in the list of API (Application Programming Interface) functions.
- cracking is not only about software security, there are many programs that use hardware security - dongles. These are most often small devices that are connected to parallel, serial, or USB ports. Only experienced crackers undertake breaking such security.
A NOTE FROM THE AUTHOR: The study presented herein is based on my experience related to breaking computer security. Most of the topics covered in this paper is described in a brief manner. The text is intended for beginning crackers. Additional material can be found on various web pages dedicated to this subject. The programs used in the paper are my favorite ones and it should be pointed out that there are many programs capable of performing the same tasks. Most of such programs can be found on pages dedicated to this subject.
Asm is not dead.
OdpowiedzUsuń